Embroidery Placement Chart
Embroidery Placement Chart - Dive in as we unravel the secrets to achieving perfect embroidery placement and elevating your designs. Whether you're a seasoned embroiderer or just starting, understanding the nuances of placement is crucial. If you want to get a printable pdf version of this page click here. Web step by step embroidery stitch guide. Centered between left and right seams. After presenting our embroidery placement guide, we received many requests for a guide geared specifically toward placing designs on children's clothing. ¼ above top stitching at edge of cuff. How to position your stitch outs. Consider size of garment and shape of design. Web expertly crafted machine embroidery designs for every project. Part 2 will give you a short cut and make perfect placement so much easier. Use the links below to jump to specific stitches or scroll through them all for inspiration. They will keep for a long time and it makes it easy to grab when you are working with linens. Web there are many charts available for many different types of garments and linens, but most of them are not specific and it is up to you to create that perfect placement chart that will work for 99 percent of your items. Downloads available in all machine file formats. 5from collar, centered between right and left seams. Whether you're a seasoned embroiderer or just starting, understanding the nuances of placement is crucial. (a) is the distance from the shoulder seem wear it meets the collar, down to the middle of the design. This guide provides step by step diagrams for popular stitches and explains their uses. 9” to 10” down from back collar seam. Consider size of garment and shape of design. Lettering should be 1⁄4 to 1⁄2 inches tall. 1 3/8 from button hole. This is part 1 of embroidery placement. This guide provides step by step diagrams for popular stitches and explains their uses. (a) is the distance from the shoulder seem wear it meets the collar, down to the middle of the design. 6.5” to 8” down from left shoulder seam, and 4” over from center. On neck cuff, centered between left shoulder seam and middle of cuff. Consider size of garment and shape of design. How to position your stitch outs. Web how to determine the embroidery placement measurement. 5from collar, centered between right and left seams. Web expertly crafted machine embroidery designs for every project. 1 3/8 from button hole. If you want to get a printable pdf version of this page click here. Proper design placement will vary by project. This guide provides step by step diagrams for popular stitches and explains their uses. Master the art of embroidery placement with our comprehensive guide. 5from collar, centered between right and left seams. Downloads available in all machine file formats. 9” to 10” down from back collar seam. It's designed to be a companion to our video tutorials which can be viewed here. ¼ above top stitching at edge of cuff. ¼ above top stitching at edge of cuff. How to position your stitch outs. This guide provides step by step diagrams for popular stitches and explains their uses. Master the art of embroidery placement with our comprehensive guide. Use the links below to jump to specific stitches or scroll through them all for inspiration. Downloads available in all machine file formats. 1 3/8 from button hole. Correct design placement depends largely on individual taste. Master the art of embroidery placement with our comprehensive guide. This is part 1 of embroidery placement. ¼ above top stitching at edge of cuff. Web expertly crafted machine embroidery designs for every project. Part 2 will give you a short cut and make perfect placement so much easier. Web print out this chart and lay page 1 and 2 back to back and laminate them. Web center of design should be 2/3rds of the way from the center front to the outside left edge (approximately 7 inches from center). This guide provides step. ¼ above top stitching at edge of cuff. Downloads available in all machine file formats. This guide provides step by step diagrams for popular stitches and explains their uses. After presenting our embroidery placement guide, we received many requests for a guide geared specifically toward placing designs on children's clothing. Whether you're a seasoned embroiderer or just starting, understanding the. This guide provides step by step diagrams for popular stitches and explains their uses. Whether you're a seasoned embroiderer or just starting, understanding the nuances of placement is crucial. They will keep for a long time and it makes it easy to grab when you are working with linens. Centered between left and right seams. Web how to determine the. If you are new to machine embroidery you can get our comprehensive guide. Lettering should be 1⁄4 to 1⁄2 inches tall. Below you will find guidelines for placing designs on everything from bibs to polo shirts, onesies to jacket backs. This guide provides step by step diagrams for popular stitches and explains their uses. (a) is the distance from the shoulder seem wear it meets the collar, down to the middle of the design. ¼ above top stitching at edge of cuff. 1 3/8 from button hole. This is part 1 of embroidery placement. 9” to 10” down from back collar seam. Whether you're a seasoned embroiderer or just starting, understanding the nuances of placement is crucial. 3.5” w x 1.5” h front of cap max size: 6.5” to 8” down from left shoulder seam, and 4” over from center. Use the links below to jump to specific stitches or scroll through them all for inspiration. Web there are many charts available for many different types of garments and linens, but most of them are not specific and it is up to you to create that perfect placement chart that will work for 99 percent of your items. Web how to determine the embroidery placement measurement. (b) is over from the center of the garment, if it has a zipper or buttons it should be measured from their.
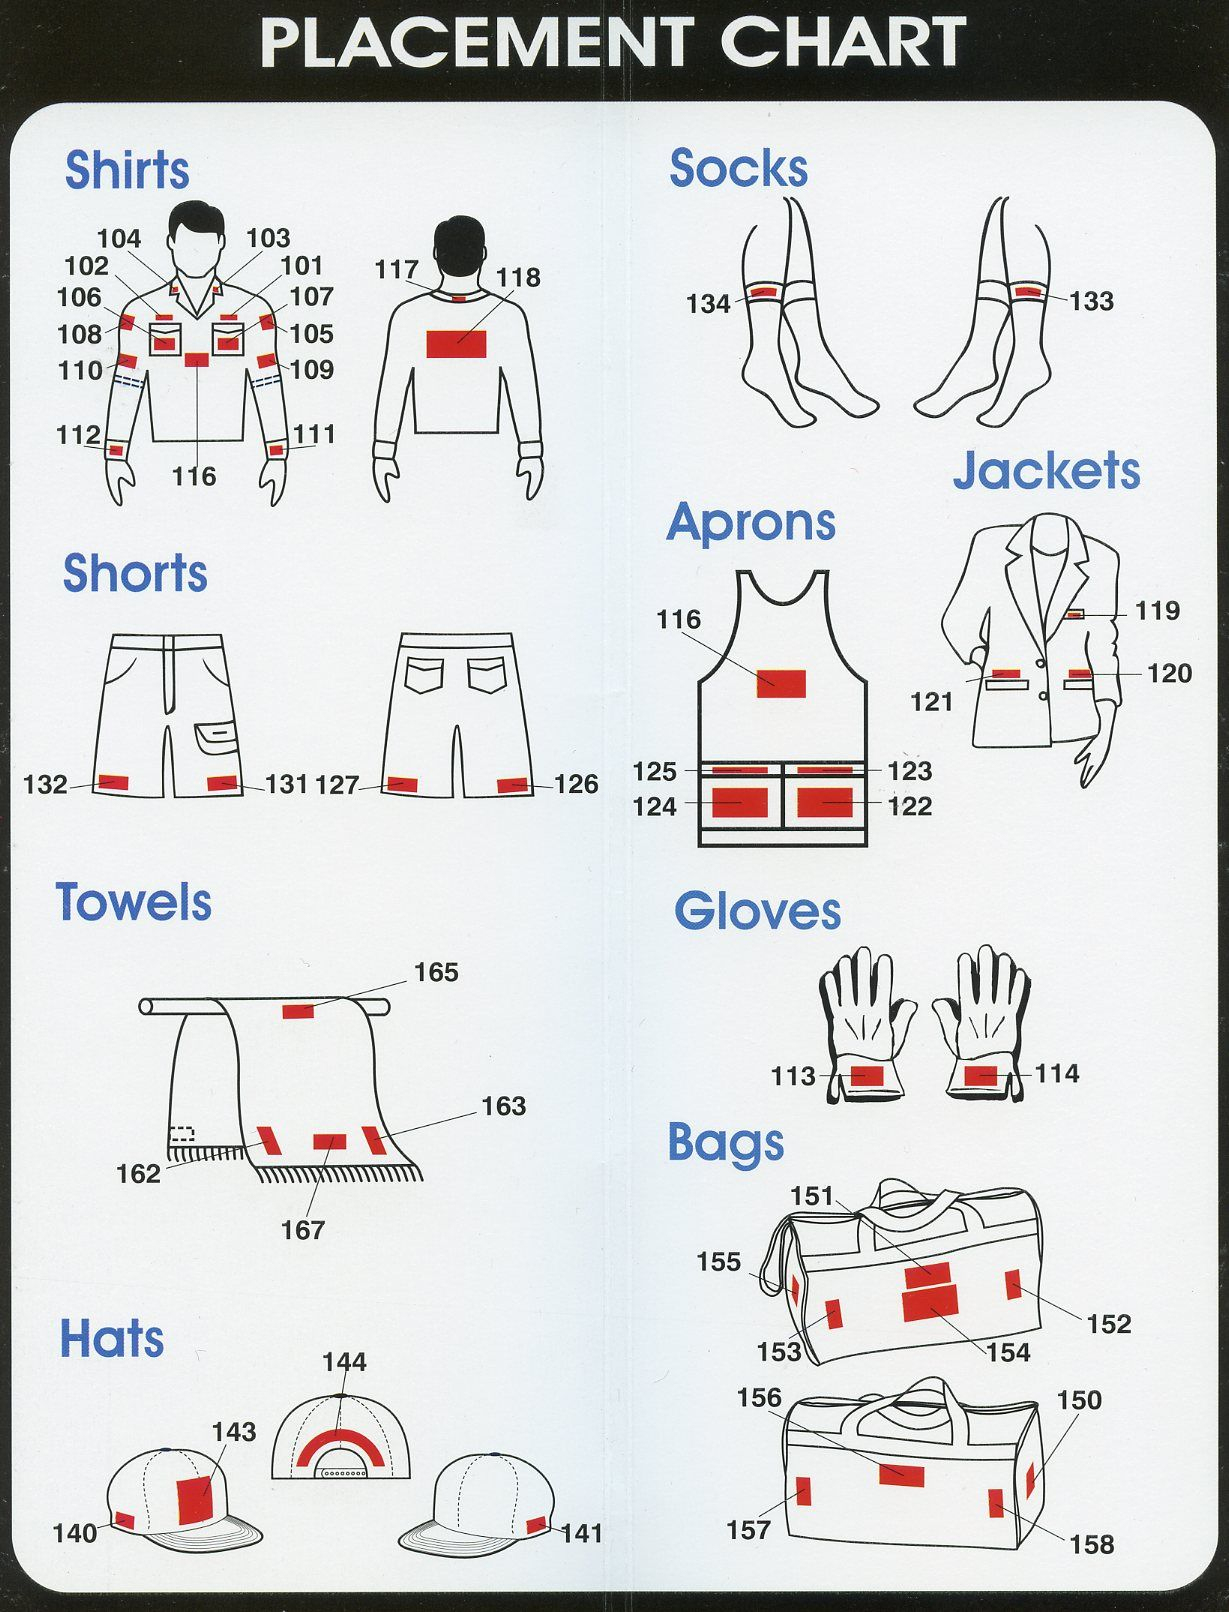
embroidery logo placement Decoration Placement Charts for Shirts
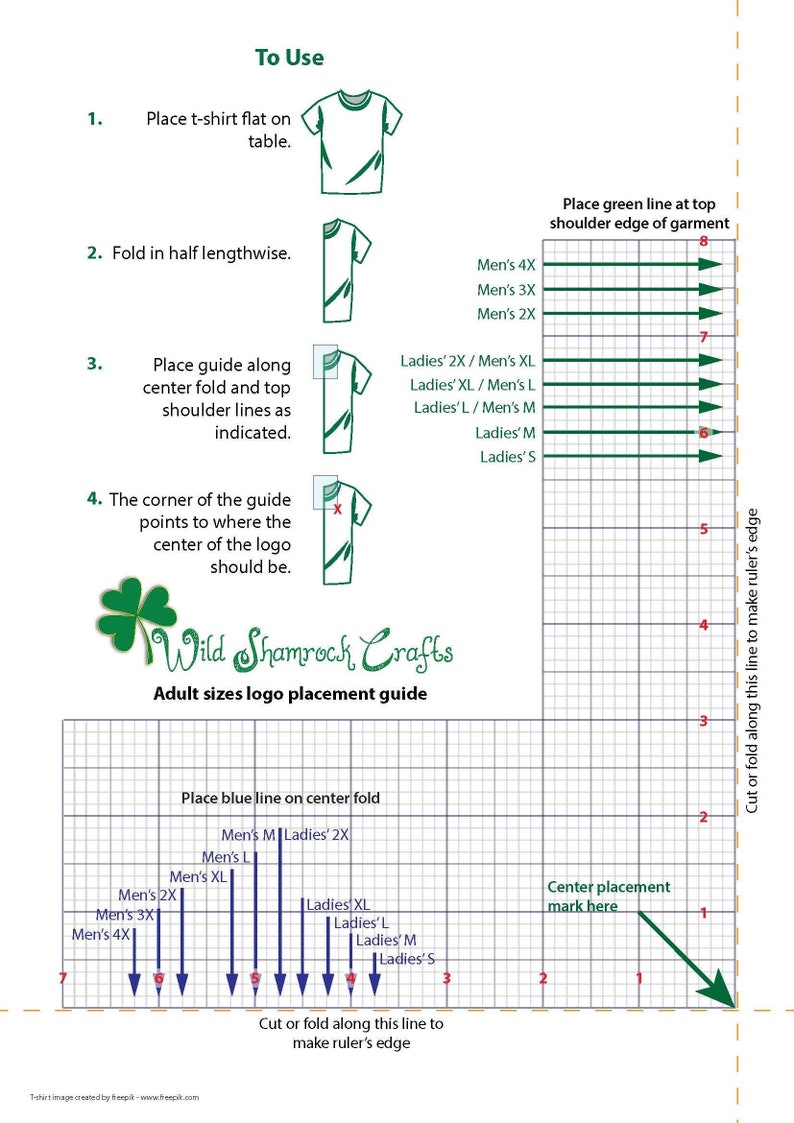
Free Printable Embroidery Placement Ruler Printable Ruler Actual Size

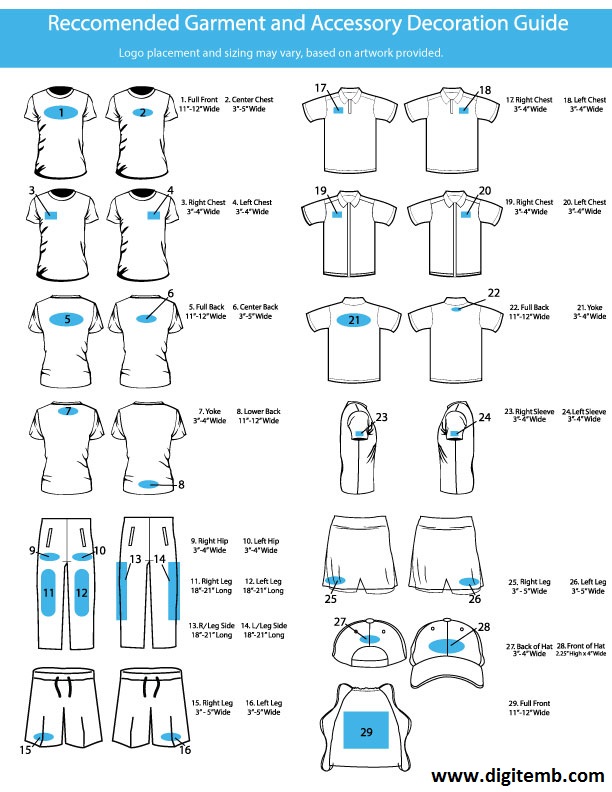
Printable Embroidery Placement Guide
How to Prepare an Object For Embroidery Placements DigitEMB

Embroidery Information New England Embroidery

Printable Embroidery Placement Guide
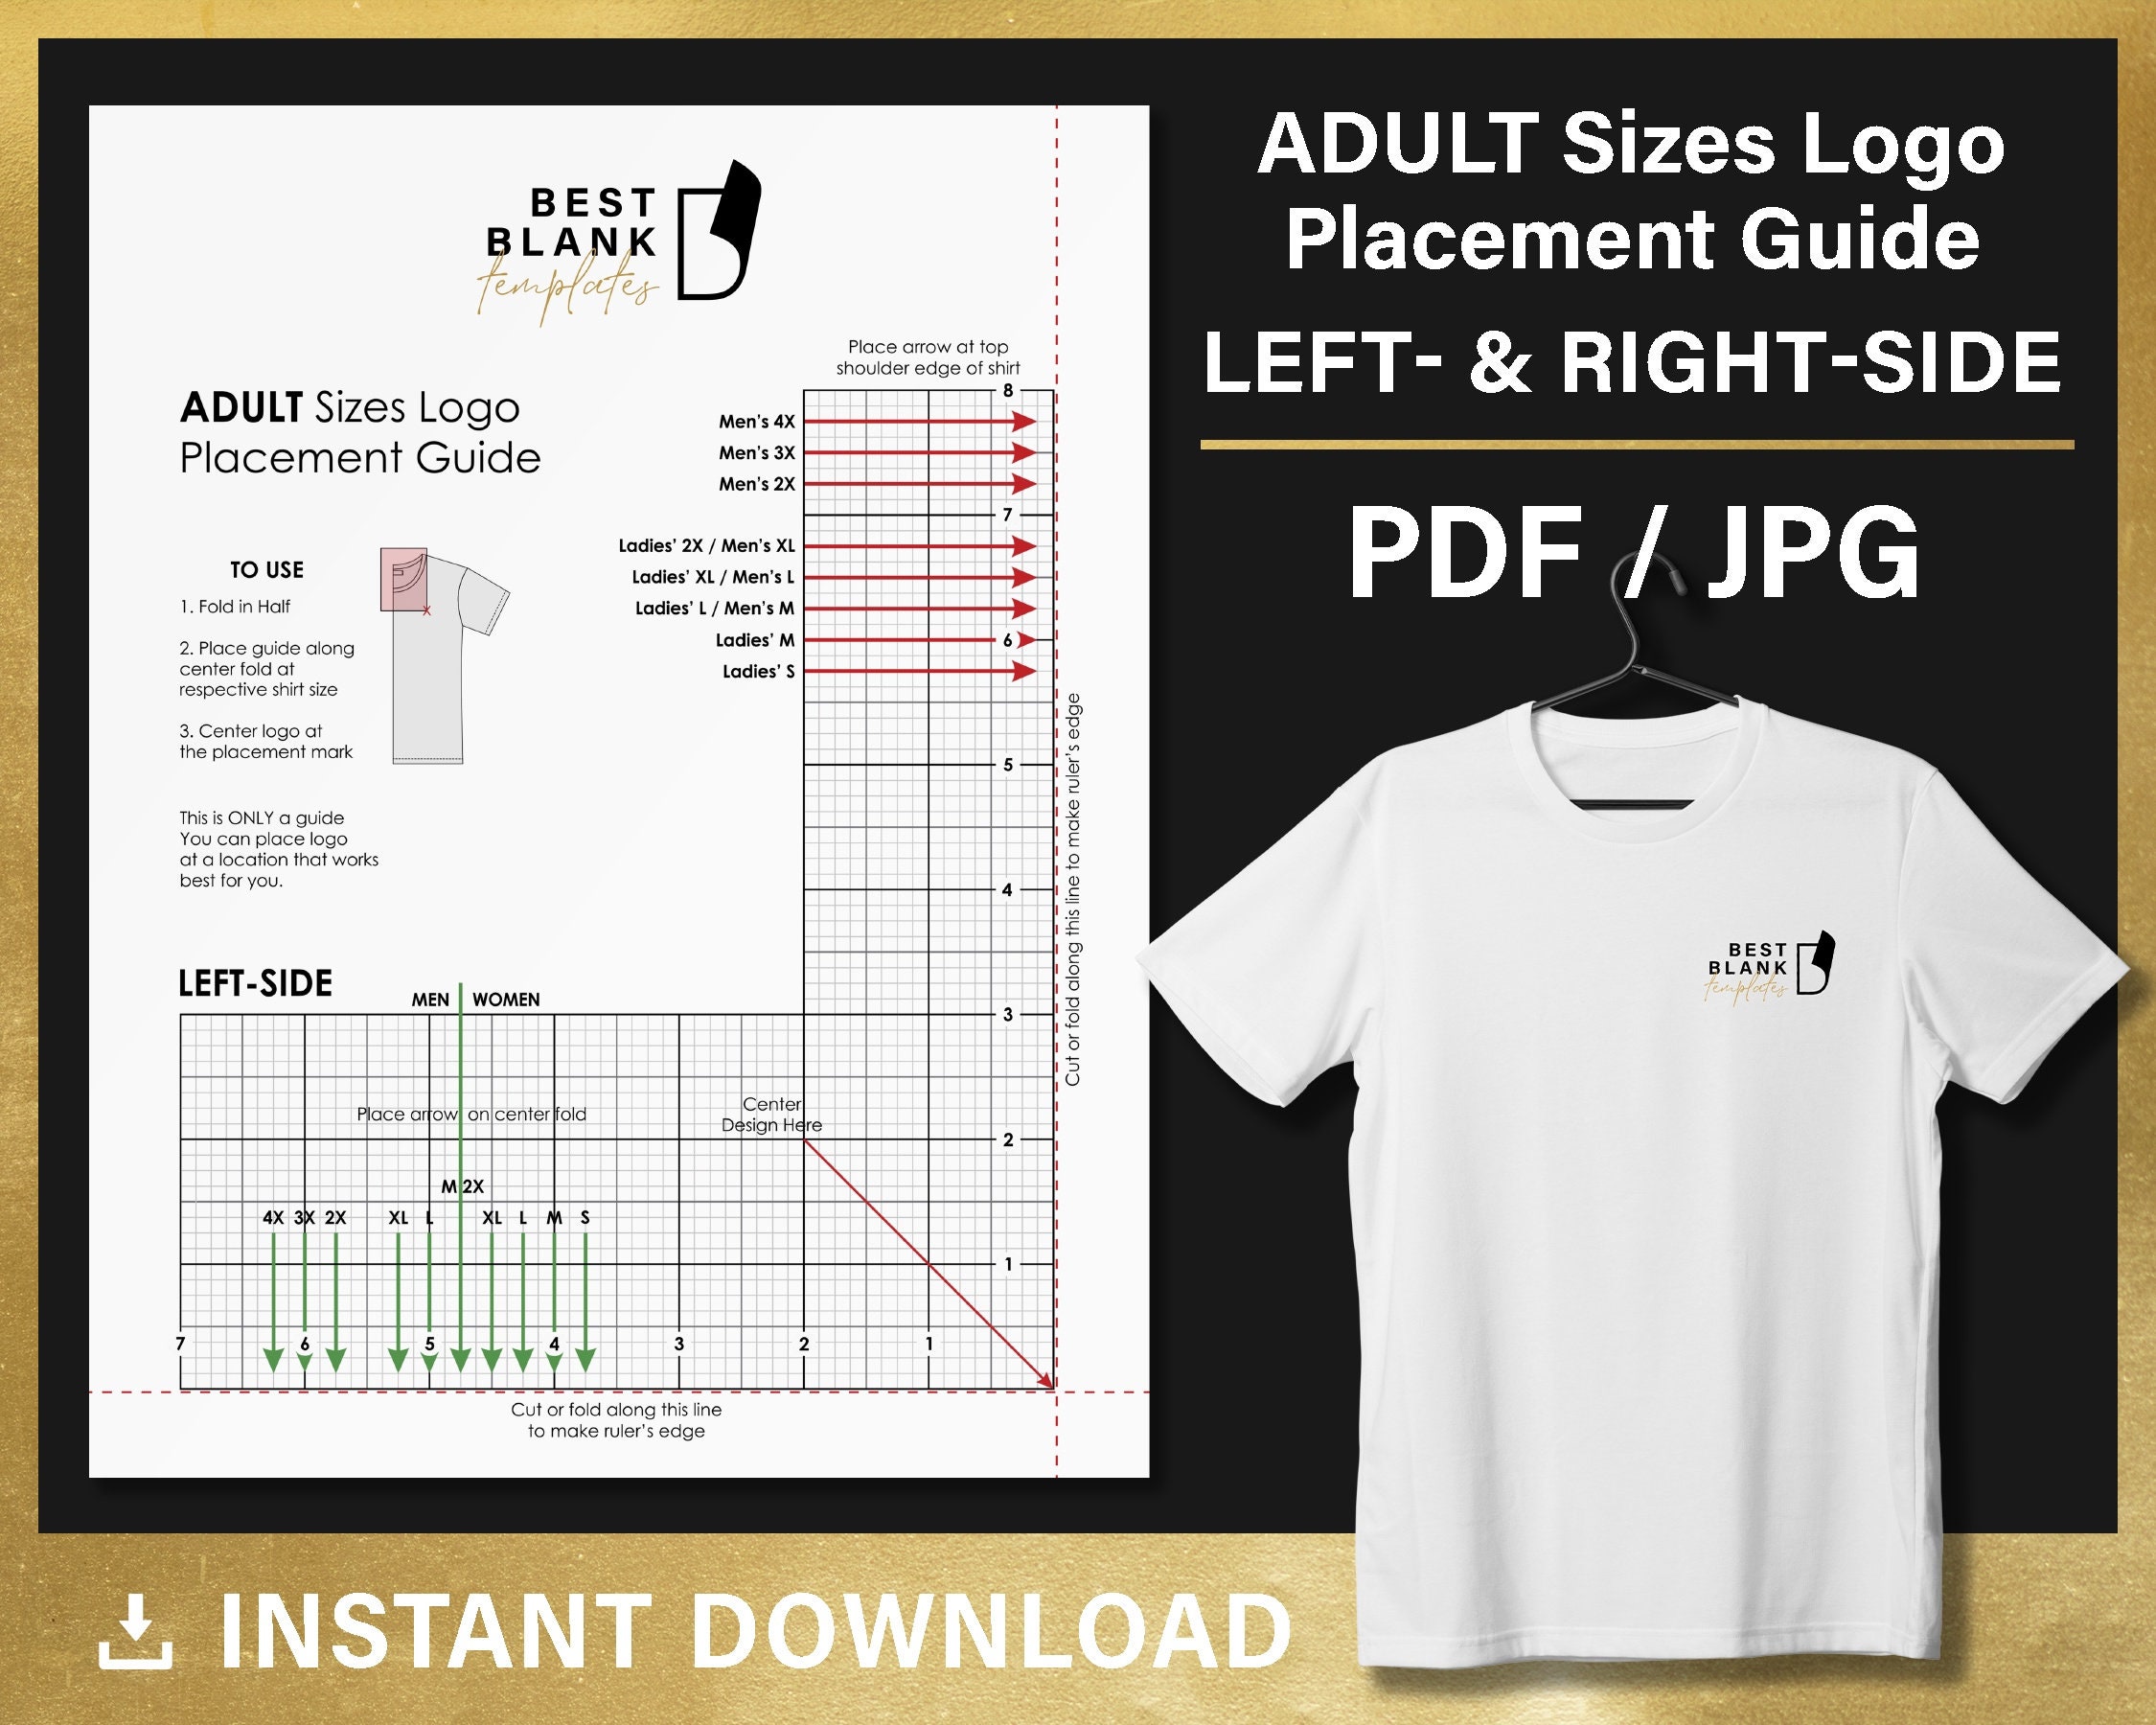
For Adults Printable machine embroidery logo placement guide Etsy
Free Printable Embroidery Placement Ruler

Placement guide for embroideries Embroideres com tips. Machine

Printable Embroidery Placement Guide
After Presenting Our Embroidery Placement Guide, We Received Many Requests For A Guide Geared Specifically Toward Placing Designs On Children's Clothing.
5From Collar, Centered Between Right And Left Seams.
1 3/8 From Button Hole.
Centered Between Left And Right Seams.
Related Post: